
Hello everyone - Thanks for peeking in today!
I was at the 'Stamperama' on Sunday and got some Fresco acrylic paints and crackle glaze. I had wanted for a long time to do the amazing crackle effects I see on other blogs. I had already got the Ranger Crackle paint but what I really wanted was the huge weathered cracks - like painted furniture left to the elements. The Ranger crackle, in my opinion, is neat and tidy crackles.....It is great and I do use it, but sometimes you want another type of crackle - now I have!
Fashionable Stamping Challenges is one of my favourite blogs...I love their challenges and usually it sets me on a path of learning and fun. Their new challenge 'Red, Brown and Black' didn't sound like one for me....I do like those colours and to be honest it forms most of my wardrobe - despite my family's pleadings with me to wear other colours!
But those colours are not the ones I reach for in projects. Then again, what is a challenge for? To give you inspiration...reach for colours that you might previously have feared to use. You know I could just take the easy path and be on the lookout for vintage pastel challenges forever - but what would I learn?. What's to lose if it doesn't work? I really wanted to practise using the Fresco paints anyway....and so all of a sudden there are ideas floating around...I may as well grab one and get started ;o)
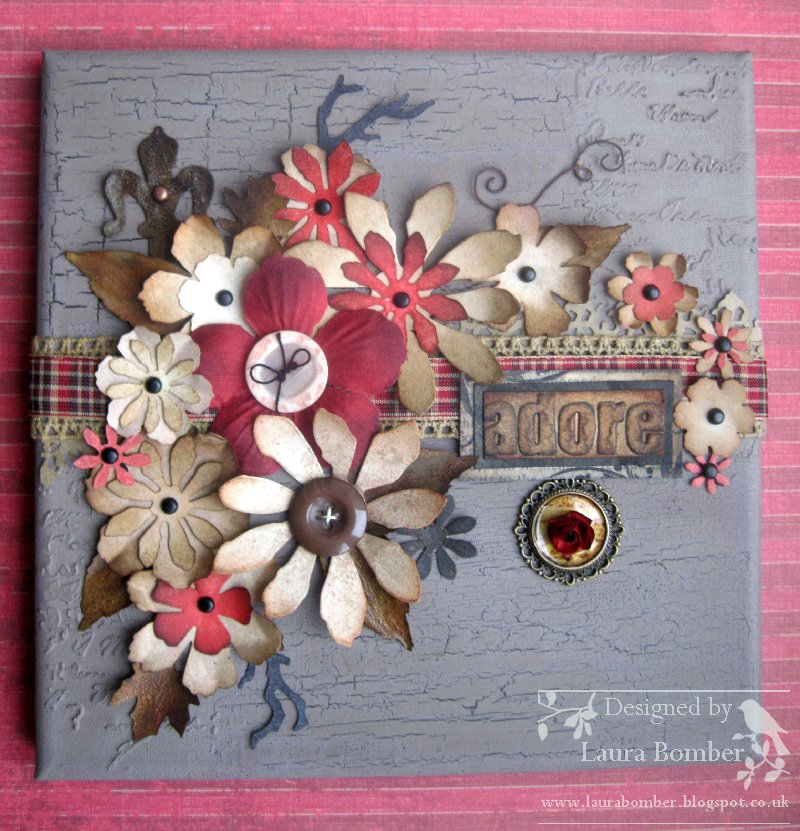
I got an 8" x 8" canvas, applied some texture paste to the ledger stencil in opposite corners. Left to dry and then applied Gesso all over.

After that was dry I applied a coat of brown Fresco paint to the untextured corners. Then I applied the crackle glaze with a palette knife over the brown paint. Once dry I applied Taupe paint thickly and quickly over the brown.

I hate doing things at speed when I am unsure of them, but the video demos I watched all mentioned the need to work very quickly, confidently and don't repaint over painted areas. So with a large brush I loaded up some paint and swept the paint in long smooth strokes along the canvas and sat back to watch the gorgeous crackles appear.
After the taupe paint was dry it looked far too grey for the project. I had thought it would be fine and I am sure grey is allowed but I wasn't liking it very much...the other paint colour I had was Vintage Lace. That wasn't suitable as it had a very slightly pink colour, and besides I LOVED the crackles on the canvas and how it looked, so I didn't want to paint over it. I decided to go over the taupe paint with Vintage Photo DI to add a richer brown colour. Sadly the photo makes it look like it is still very grey...In real life it is actually much more of a warmer brown tone (and I also think the whole thing looks much better IRL too) - Sometimes the photos capture the colours and effects really well but in my eyes this time it hasn't.....I do wish you could all see it for real....but I am afraid the photos will have to give you a hint of it instead.......
I originally had covered four squares of card with my brand new Frayed Burlap DI and then added various stamps and planned to place them on the canvas with some flowers....This canvas underwent some changes in ideas...I decided three looked better, but still wasn't great - something wasn't right about the squares of card.....then it went down to two....then one central square....but it still didn't look right....Out that last remaining square went and in came some crochet lace and tartan ribbon along with some leaves that I covered with Frayed Burlap DI and some Ranger Crackle Glaze to go with the crackles on the canvas.

I coloured the flowers with a mix of Fired Brick, Walnut Stain, Frayed Burlap and Antique Linen DI's and fixed them with shiny black brads in the centre.


Once the four squares were out I began arranging the flowers. I added in a pendant which had a round piece of card covered in Antique Linen stain and was stamped with script in Vintage Photo DI. It was covered with glossy accents glue and a red rose was placed in the centre.

The word ADORE was cut out of an embossed sheet of words, stained with Antique Linen Stain. I drew around the word in very fine liner permanent pen. Then I covered the word with Vintage Photo DI and dabbed along it with water. When it was dry I blended Pumice Stone DI over it to tone down the brown and make it look more vintage. It was then placed onto card inked with Black Soot DI and sprayed with copper glimmer spray and then that was glued onto card that had been inked with Frayed Burlap DI and stamped with a flourish stamp.


Hope you like it!...I certainly has made me braver about tackling other colours. Now to get going on Broken China, Shabby Shutters and Scattered Straw! And add more Fresco paints to my ever growing wishlist ;o)
It would be lovely to hear from you if you read this post and like what you see....Perhaps you could also join my blog and come back another time? Would be great to have you on board my craft journey.

I am entering this into the following challenge -
Fashionable Stamping Challenges - Red/Black/Brown
Crafty ribbons challenge - Button up
Stampavie - Lots of layers
ADORE this Laura! Love the crackle/stencilled background which has worked so well and your flower bouquet is just perfect for this wrapped around the ribbon band. Huge hugs, Jenny x
ReplyDeleteGreat texture on the canvas background from the paste and the crackle... and the flower arrangement is spectacular. Love the crackly leaves too!
ReplyDeleteAlison x
Justs wonderful Laura such a lot of details and so delicate - WOW
ReplyDeleteXOXO
SanDee
Gorgeous! Hugs trace x
ReplyDeleteA beautiful card with wonderful flowers. Thanks for joining us at FSC this fortnight.
ReplyDeleteBeautiful creation. I love the scene you create.
ReplyDeleteThanks for joining us at Crafty Ribbons
hugs Anke
I really like this profusion of beautifully coloured flowers bursting over your canvas and the leaves are fabulous. Can you tell me how you apply your Fresco Paint - I've tried sponge and brushes but can't seem to get the required effect. Do you thin it down or just use it as it is? Thanks so much for coming over to my blog and leaving such a lovely comment - I really do appreciate it.
ReplyDeleteGorgeous crackle effect. I hope butterfly is well supplied with the stuff - I can see many uses for it in the dollshouse work that is about to begin....
ReplyDeleteThis is fab Laura!
ReplyDeleteI love entries that are a little different from the usual - this is ticking my box!!
Thanks for playing at Crafty Ribbons
Have a good week
:)
Laura
Hi Laura...love this project and the colours you have used. Great crackle.
ReplyDeleteThe tattered florals are beautiful
TFS
Annie
Beautiful!
ReplyDeleteA fantastic project with great detail. I also found the color combination a difficult one to work with, but in the end I was glad I tried.
ReplyDeleteThanks for joining us at FSC this fortnight.
xxx Ellie xxx
Hi Laura, absolutely beautiful, the crackling effect on the canvas is just gorgeous and the floral display is superb. Thanks so much for sharing it with us at FSC. XX
ReplyDeleteLaura I just love that you took yourself off in a new direction, challenging yourself outside your comfort zone isn't easy, but you created a masterpiece. You put the colours together perfectly and with amazing textures and a gorgeous design. Congrats on the amazing outcome. Thanks for linking to the FSC challenge this fortnight.
ReplyDeletehugs {brenda} x0x