Friday 14 December 2012

12 Tags of Christmas


    This will probably be my last post before Christmas....and here is my one and only Christmas tag - made into a door hanger for the 'Simon says' challenge.

    When I first saw the Simon says challenge I thought I wouldn't be able to do it...mainly because I don't own all the materials needed...I hunted through all the tags and thought how amazing they all there and really I doubted that I could do anything like that...I was inspired to do something though (Tim Holtz work really does inspire you!)...so I began to think...what can I do with the things I already have and what could I achieve here?....

    So here is my Tim Holtz inspired Tag (door hanger)


 If you want to see which tag inspired me - here is the link - Christmas Tag


    First problem I had is that I don't own a diecutting machine - so to make the roses I drew flowers freehand and cut them out myself. I followed Tim's instructions to make them...cut them from ivory card and edged them with Antique linen DI.


 I do have two leaf stamps so did some wrinkle free distressing on card with Peeled paint and Antique linen DI's and then stamped the leaves and cut them out, inking the edges with more DI's.


I drew holly leaves, did wrinkle free distress in Peeled paint and Gathered twigs, cut them out and covered them in clear ink before embossing them to give that wonderful holly leaf shine.


For the poinsettia, I cut out petals, stamped a floral image on the petals with antique linen and then embossed. The center of the flower gave me a few problems and basically has been unsolved...it is the only thing I actually dislike on this hanger - but it is the best of several bad ideas!


I don't own any word stamps, and I didn't want to copy the original tag - I wanted it to be inspired by rather than an exact copy of. I did want some wording on this hanger though, so I used some adhesive letters to add the word 'Joy' I chose a beige colour as black would have been too harsh against such a delicate coloured background.


The base of the tag was ivory card edged in Gathered twigs DI. The music was stamped with the same DI ink and the flowers arranged on the card. Then it was all placed onto a wooden door hanger.

    All ready for Christmas! I really enjoyed making this and I do hope you like it.....


    Thank you for reading this - and thank you all for making me feel so welcome in the craft blogging community for the last month. I wish you all the very Merriest Christmas ever and a very happy New Year

      Love and hugs
        Laura xxxxxxxxxxxxxxxxx


   I am entering this into the following challenges -


Simon says stamp and show - Inspired by Tim's 12 tags
Stamptacular sunday challenge  - Anything but a card
Anything challenge - Anything goes
Simon says stamps challenge  - What's your favourite? (Distress inks & embossing powder)
Do you stack up - Christmas
Christmas at sweet stamping challenge - Anything goes
Vintage stamping challenges -  Challenge #3 Pocket full of posies
Crafty mess challenge  - Vintage Christmas
thankful thursday challenge - Anything with music
Little miss muffet challenges - It's beginning to feel a lot like Christmas
DL.ART Thankful thursday challenge - Red and green


Sunday 9 December 2012

Herman


   A lot of blog posts I have visited in the last week have been filled with recipes for Christmas and I thought I would take a break from craft blogging to give you a Christmas recipe gift -

           Introducing......Herman!


   And what is Herman? Herman is a German Sourdough cake - and it is one of the best cakes I have ever made. I am giving you plenty of notice before Christmas to be able to make it, because Herman will be living in your kitchen, breathing, growing, gurgling and he will be the basis for a gorgeous cake and will provide you with three gifts to give to friends so that they can make their own Herman.


      Ingredients  

       1 packet of active dry yeast
       2 fl oz of lukewarm water
       5oz plain flour
       8oz caster sugar
       1/2 pint of warm milk
     
      Method 

       1. Dissolve the yeast in warm water for ten minutes and stir
       2. Add the flour and sugar and mix thoroughly
       3. Stir in the warm milk
       4. Cover the bowl with a clean cloth
       5. Leave in a cool dry place for 24 hours
       6. Follow the other instructions for 10 days


    Now here are the instructions that have to be given to other people if you plan to hand out the remaining portions to friends so that they can 'grow' their own Herman....follow these instructions for the 10 days following making up the starter mix......


     Hello, My name is Herman.
     I am a sourdough cake
     I'm supposed to sit on your worktop for ten days without a lid on. 
     You CANNOT put me in the fridge or I will die
     If I stop bubbling, I am dead.

    Day 1. You get Herman and put him in a bowl and cover him with a cloth (if you made the starter mix you have done this already)
    Day 2. Stir well
    Day 3. Stir well
    Day 4. Herman is hungry - add 5ozs plain flour, 8oz caster sugar and 8fl oz milk. Stir well.
    Day 5. Stir well
    Day 6. Stir well
    Day 7  Stir well
    Day 8. Stir well
    Day 9. Herman is hungry again. Add the same as day 4 and then divide Herman into four equal portions and give away to friends with a copy of these instructions. Keep the fourth portion.
    Day 10. Herman is VERY hungry. Stir well and add the following -

     8oz sugar
     8oz flour
     2 eggs
     2tsp cinnamon
     2 heaped tsp of baking powder
     1/2 tsp salt
     1/3 pint of cooking oil
     2 cooking apples cut into small chunks
     5ozs of raisins or sultanas

      Mix everything together and put into a large greased baking tin. Sprinkle with brown sugar and 2oz of melted butter and bake for about 1hr at about 350f. When cold cut into pieces. Herman freezes well and tastes wonderful served with cream, custard or ice cream.

     This cake can be made in many varieties - you can add any spices or fruit to create your own unique Herman!

    Have fun!!!!! ;o) xxxxxxx
    

Home Sweet Home


    I think the ATC's are my new passion. I go through this in crafts. I will be devoted to crochet and end up with dozens of half made items and then move on to glass painting...after a while I am bored with that and I will start work on my dolls house again before suddenly declaring that I want to do paintings. Variety is the spice of life (so people say) so maybe it is best that my craft interests are always switching.

    I wanted to do the latest challenge for Simon says which is 'House rules' I sat at my desk waiting for inspiration. On a piece of card I began to use watercolour pencils and draw a house, colour the sky..spray with water - Yuck! What was I thinking?!!! Scrap that smudged mess.....hunting through the scrap paper box, maybe a paper pattern might set me off in the right direction (it usually does) - I saw the beige flower paper and thought "That could work" As what? I had no idea but it was a start.

    I had a piece of card cut to size and stuck the patterned paper over it. Obviously it needs more than that.....I carry on hunting through all the bits and pieces. Suddenly I find a die cut of a row of houses...I only hunted through the paper collection yesterday and never came across that die cut then - Isn't it amazing when something turns up exactly when you need it. I don't own a die cutting machine so I think my sister-in-law must have given it to me. Hmmmm....houses...well, that is right for the project...YAY! Now what am I going to do with them?

      I cut one house off the end and covered it in pale orangey/red paper, inked the edges in Gathered twigs DI...coloured the roof in with charcoal pencil...looks nice and shabby. I cut some flowers from a tag illustration and stuck them on the base of the house. I wanted to use the quote "There's no place like home" So I stamped the letters with a mini alphabet stamp set I have and cut out the words and inked them in Antique linen. Then covered with embossing powder and heated them.

     I covered the remaining strip of diecut houses with Antique Linen DI and attached them to the background. My first idea was to paint all the houses different colours but then I thought it would be better if they were almost blended into the backgound, with the orange house - being the home - standing out.

      Dark brown corrugated card was cut into a heart and the edges were distressed and inked, ink was rubbed over the ridges too and then the words were stuck down with the final word 'home' placed on the roof of the house.


Hope you like it!


I am entering this in the following challenge -

Simon says stamp and show - House rules
ATCs with attitude  - Anything goes
Artistic inspirations - Anything goes
Fashionable stamping challenges  - To die for

Friday 7 December 2012

ATC Challenge


    I am fairly new to ATC's...I only started doing them this week. After a wobbly start I think I am really enjoying them - In fact I think I am beginning to get a bit addicted to them. At first I struggled to come up with ideas and quite a lot headed to the bin.

     I love the fact that they are designed to be swapped and sharing art is wonderful. Also I really like the fact that sometimes they can be done so quickly. As much as I enjoy complicated, time consuming projects, it is so nice to be able to complete something so quickly.


        I think this is my favourite ATC that I have done so far. I love the colours, I think the metal attachment looks lovely and it was actually quite nice to leave the inks and stamps alone for a while and focus on the paper tearing and layering that I have always loved doing - back to basics I suppose! I don't think there is any chance of me abandoning the DI's anytime soon though as I think you might guess by my using the Antique Lace DI.

       All of this ATC was made using scraps and bits and pieces. I used scrap paper that I store in a huge box. I love rummaging to find suitable bits and I never throw any bits of paper away as even the smallest piece could just be the perfect piece for the item you are making. The metal attachment was found at the bottom of my Bits and Bobs drawer. I can't remember where I got it from but at last it has a home!

       The ribbon was from a Christmas gift a few years ago. The word LOVE was the very last piece from a 12 x 12 scrapbook background that I bought probably about eight years ago. It was a beige vintage style paper crammed with words and I thought it was far too nice to use as a background and hide behind photos and embellishments. So I used it as embellishments instead and it has made many many craft items.....sad to see the last piece used, but it lasted well!

       All the paper was distressed in Antique linen DI and the word LOVE was coated in clear ink and coated with clear embossing powder and melted. It was the first time I had used embossing ink/powder on very thin paper and the wording went from opaque beige to a slightly mottled beigey-grey....To me it began to look like a shiny stone effect. I was quite pleased! 


       I am entering this ATC in the following challenges -

ATC's with attitude  - Anything goes
Fun with ATC's - Challenge #76 Embossing
Artistic inspirations  - Anything goes


ATC's


   I have seen a lot of ATC's on my blog travels and I really like them...it is a lovely idea to swap work like this and have a collection of other artists creativity. At first I found it quite daunting to work on such a small scale, but in some ways it makes it easier not having to find things to fill a space!


    One of my first ATC's - Not too keen, but I was just experimenting with the dimensions of the card and what would fit. Finding out what I liked and didn't......


I began to play around with the DI's and embossing techniques and basically see what happened....several cards never made it past the first ink stage, but it is all about learning....Sometimes it goes wrong and sometimes it goes right.


      I was really pleased with how the orange and purple blending went. I have a very limited range of colours at the moment, but it is fun seeing how I can get them to work.


 Here I used the inks as watercolour paints. First I blended Ripe Persimmon, Seedless Preserves and Peeled Paint across the card. I then dabbed the ink pads onto the craft mat, add a spritz of water and mix the colours. The bright orange and purpley pink made a gorgeous red and the peeled paint and gathered twigs provided the colour for the grass.


I decided to emboss the poppies..so I used a paintbrush to pick up the ink from the clear ink pad and applied to the flowers. Clear embossing powder was used and the flowers had a wonderful gloss texture.


   This is a tag that became an ATC. I didn't like the tag very much except for the heart and flowers detail. So off they came and were added to a gorgeous green patterned background.


And the same again here. This was a tag, but I felt that the stamp had got lost in the corner of the tag, so by cutting it down to ATC size it looked much better.


  Here I decided to see what stamping in bubble wrap would do....and kept layering colours and also inking over clear embossed stamping. I was going to put something else on the card but I didn't want to cover up all the lovely colours and textures.


 This is a very special one...This one I wouldn't swap but then really who else would want it but me? My favourite photo of my children surrounded by inked, stamped and embossed card strips and hearts


Hope you like my first attempts at ATC's - Any one wanna swap? ;o) xxx


    I am entering the following ATC's in these challenge -

   Wicked Wednesday - Wing it - Butterfly
   Fun with ATCs - Embossing - Poppies
   ATCs with attitude - Anything goes  - Children


Thursday 6 December 2012

A dolls house gift - Part 2


   Now to finish the story of the dolls house gift......


       So at the end of part 1 I had made a few items for the room...I had made the butchers shop and now needed to set up the room....


Here is the room at the beginning - no wallpaper or carpet, but just testing the furniture out! I have no photos of decorating the room at all. I got some dolls house carpet and some Laura Ashley wallpaper (£1.50 for a huge roll!) and it was a nightmare to decorate.

    The box itself is quite small and wasn't very deep...as a scale room it would be smaller than a box room. It had awkward corners and everytime I cut a piece of paper to fit I would find I had cut the wrong angle - however careful I was. Long suffering husband came home to find me in tears and about to kick everything across the room. As usual, he picked me up saying "You can do it" and I had several more goes, cursing every time the paper ripped or I got the measurements wrong - AGAIN!

   As the saying goes "practice makes perfect" - Well, it probably isn't perfect - but I got the walls covered at least!

    So now the really fun part of minatures - creating the little bits and pieces. The room looks nice already but it is the little details that makes miniatures so fascinating. I love the small details that make the room. I could have left it quite basic and it would have been fine, but I wanted little elements like the spilled paint with kitchen roll and vanish carpet cleaner....the mess of paper and wood...I could have come up with more no doubt, but space was minimal!!

 So small items get added....a work mat was easy, scrap of paper - have plenty of those ;o)
   The pencil box came from a dolls house printables site I found....just print, cut out fold and glue and you have a dolls house item!


Fimo works well for minatures. Nearly every craft item here is made from Fimo. I have made paintbrushes with red Fimo, masking tape and bristles cut from old paintbrushes. The pencil is made from Fimo as are the sausages and ham. The PVA glue pot is also Fimo as is the ruler....


It was a shame that the sausages weren't exactly 1/12th scale but that was the smallest I could make without them breaking! The paint pot was a cut up plastic tube filled with acrylic paint that I dabbed along the edge of the table.

    I put a 1p coin in this photo so that you can get a clearer idea of just how tiny some of these objects really were.


And the hinges in the butchers shop do work!
The prints and tiles on the wall are printed from the photos of Gil's butchers shop that I took when I was preparing this gift.

  I knew I wanted mess....So of course in this room the blue acrylic paint has spilled on the beautiful cream carpet (not a good choice floor covering for a craft room!) I made the kitchen roll by rolling up some beige paper in a small roll and then wrapping a strip of toilet paper around it (had to be toilet paper as kitchen roll has too large a texture pattern to be used at such small scale)....I made the Vanish cleaner with pink Fimo and printed the label....scrunched up small pieces of tissue and splodged some paint on the carpet. Was a nervous moment as mistakes couldn't be made!


     A few years before, Gil had given me some mushroom print material. I knew it would work well in this room as she is passionate about mushrooms and I really wanted the room to be about her...hence the butchers shop which is an interest of hers as is the dolls house world. The silver frame has a portrait of her grandchildren and several items in the room came from her dolls house collection...I wanted it to look like a room she would have.

    The cushion was easy to make as it required only simple sewing...and was filled with semolina. Good tip for making dolls house cushions is never fill them with cotton wadding as it makes the cushions look less authentic. Filling them with semolina means they look far more realistic in their 'just been sat on' look.The laptop computer was another printable form a website - just print, cut and glue.


The finished room! - But hold on a minute....something isn't quite right here. Didn't I say I wanted it messy? Right....time to make some mess!!!! Cutting up bits of paper...scrunching paper...planks of wood, the box of scrap paper (we all have one of those!) notes, planner, letters, envelopes, C.D's - everything was scattered everywhere.....


I couldn't resist this little joke!
And here it is....the finished messy craft room...


      I hope you have enjoyed reading this two part blog post...If you have then please leave a comment. I would love to know what you thought of it.


I am entering this in the following challenge -

Simon says stamp and show - House rules


Monday 3 December 2012

A dolls house gift - Part 1


     I was going to do one blog post about gifts I have made, but after thinking about what to include I realised it would make the post so gigantic and perhaps a bit tedious for people to wade through. So perhaps the best thing to do is to post individual ones. This post is about a gift for my mother-in-law...the preparation for it was quite immense so I will be doing this blog in two parts.....

     
          My mother-in-law Gil, adores dolls houses which you could find out about here

I had always wanted a dolls house and nearly 5 years ago Gil bought me one and I am gradually making the furniture for it. I always said to her I couldn't make my own furniture and she insisted I could. Well, she was right - I got well and truly hooked into the world of dolls houses and I adore making things for them. I am still learning how to do it...It can be a tricky job but I love the challenges it presents and, after nearly collapsing when seeing the prices of ready made dolls house furniture, I love how cheap making dolls house furniture can be.

So, along came the time when I needed an idea for a gift for Gil's birthday...In my family there is the general assumption that handmade gifts will be given and I do try to come up with something original each time. 

I did have a wooden box with a glass front .............


............and I had had no idea what to do with it so it had been put up on the top shelf of the art cupboard and there it sat for a couple of years. When I began to develop the idea of making a dolls house room, something Gil had made for friends and family before so I knew she loved the concept, I got the wooden box down again and began to try and come up with some ideas.

    As usual, I went to my sister-in-law Alison for some advice. I said I had this vague idea of making a craft room...perhaps showing the construction of a dolls house? The idea of it being similar to how Gil (and myself) work.....amid total chaos!

      Alison suggested that the room contain the makings of a butchers shop - as this is something Gil really likes and had made one for herself with Alison's help years before. She showed me some photos of the type of shop she was talking about.....


 .....Well, I was going to be making a 1/12th copy of that 1/12th shop!...it wouldn't be as detailed as that!!! But, of course I breathed a HUGE sigh of relief when Alison pointed out that mine didn't have to be...this was a work room and this shop would be being constructed. So it was decided that the person working in that room hadn't got as far as making all those little details......That would work!

  Alison also showed me the butchers shop dolls house that Gil had made years before. I took photos of it, so that I could have some reference to help me construct a 1/12 scale butchers shop doll house. I wanted to recreate the one she had (as close as possible)...

      First thing was to have a plan of what to put in in the dolls house room....I had made quite a bit of furniture for my own dolls house and several items I had changed my mind about after I had made them. So they were the first things to be chosen.......


     I thought the best thing to do first would be to make the little dolls house that will be in the process of being 'created' in the dolls house room....


After constructing the roof, I realised it wasn't going to work...The angle was wrong and was too high...so off it came and the flat roof looked much better


 I decided the room should have a Victorian sampler on the wall. I do love sewing - in small amounts and this is as small as it gets really! So I found some cotton, got out the embroidery hoop and cottons, researched some Victorian samplers and printed one. Placed the material and image over a light box, I then traced the image in pen and sewed! You can see from the £1 coin, the scale of the sampler and how tricky it was to do!

 I made the frame from wood painted in acrylic paint


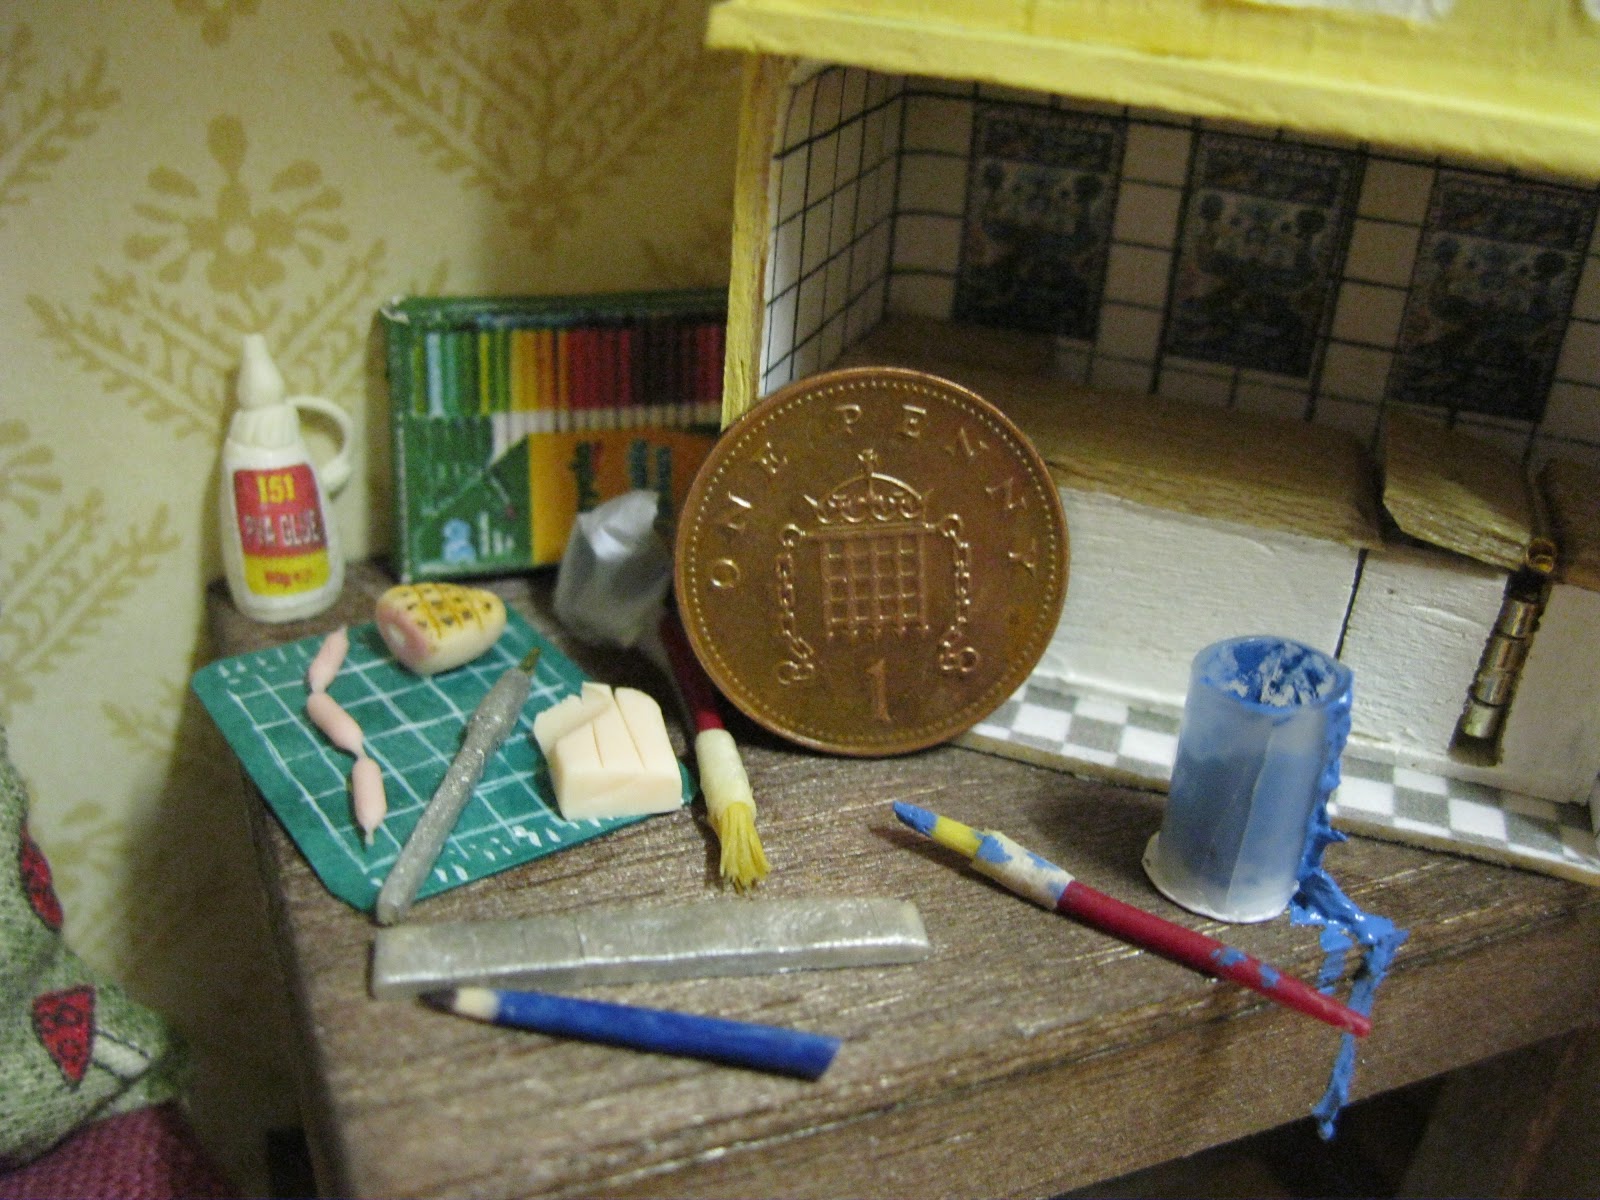
 For the work desk I knew I would need paints, pencils, work mat and of course, the dolls house makers very important craft tool - the craft knife. I own one myself so working out scale was easy....but oh goodness! Tricky to make such a tiny item.......
 And that IS a metal blade attached!

 A little book shelf was quite easy to make and painted the same brown to match the sampler...I didn't make the lamp (one of the very few things that I didn't make) and the books were made by my mother-in-law for my birthday present which was my life in books....she had a few extras that she gave to me later, so I placed them on this little bookshelf
 I wanted a corner unit....so that was another thing to make...Far trickier than the bookcase as all the shelves have to have pieces cut out so they attach to the legs of the unit....and making sure the glue sticks with the legs straight is a huge challenge and not best suited to someone with my total lack of patience ;o)
 Painted with the same brown paint, here is the finished corner unit...I didn't make the flowers (though I could have done) These were bought for my dolls house and I decided they didn't fit in anywhere and were best used for this project.
 Probably the easiest thing to have made....the bin!!!!! A bottle cap jammed full of scraps!!!


    So that is that for this post about the Dolls house gift....I will be writing 'part 2' soon!

......and for those of you who can't wait I will finish this blog post with a peek at a corner of the finished room........


  Hope you like what you saw - Please leave a comment if you did - I would love to know what you thought of it.