Showing posts with label wings. Show all posts

Tuesday, 18 August 2015

Queen Charlotte


Hi everyone, 

     I am here today with a creation I made a while ago - when I was experimenting with the Andy Skinner rust technique that I featured here at SanDee and amelies steampunk Challenges, I did several experiments with this wonderful technique and here is one of them...


 You can see the video for the Andy Skinner rust technique that I used here

This one (the background in the frame) was a bit of an experimental practice run. I wanted to see how the technique worked with just plain embossed card...

The answer is - not very well (at first) The card buckles as the sand texture paste is drying and the embossing began to lose a lot of detail. I glanced at it and dismissed it as a mistake....but I decided not to waste it anyway and do the paint effects as well....at the very least it was a chance to have a practice run with that as well...

    This one turned out very different to the rust effects on the creation featured here....I applied the paint much thinner....the Paynes Grey was only applied in patches and I did a watered down coat of Quinacridone Gold...I was really impressed by the results!

     So I decided to use it in a creation - and I loved the final piece

   I had a set of trio paper mache frames and decided to cut one down to a single frame and covered the cut end with card. After doing that I covered it with German text paper stuck down with Mod Podge glue. I then covered it with a layer of Mod Podge glue before painting it with Transparent Yellow Iron Oxide.

I then covered it with Crackle glaze


  I dabbed all over the edges with Raw Umber paint


I stuck the rusted embossed card into the frame


A dolls head was lightly painted with raw Umber paint before being stuck onto a brass flower and having a brass crown attached. A brass key was also attached...


Wings were cut out of rivet embossed card and painted with gold acrylic paint before being dry brushed with Raw Umber paint


A chit chat sticker was used that had been dabbed with Vintage Photo DI and attached to a brass frame


A brass screw brad was used to attach brown hemp string to the frame


So there is my Queen Charlotte creation....I hope you like it!

Happy Crafting!

Laura xxx


Follow on Bloglovin

Monday, 27 April 2015

The Wish Fairy

Hi everyone!

 My wonderful DT member Laurie invited me to be on her FB Challenge team this term. I am still so thrilled to be doing this - the challenges have been so much fun!

In May the challenge is to make something with a papermache cone


You can buy yours from Laurie's shop and the rules of the challenge can be found here.

I did struggle a bit to come up with something for this challenge - a quick peek at Pinterest for some inspiration (great way to lose a few hours!) revealed lots of Christmas decorations - it seems most of the time these cones are used for Santa and angel models, trees and gift cones. I wanted something a little bit more original....

    My first thought was this could be a dress - why not make it into a doll? Then I thought of a frame (as I always seem to do) and it then made sense to split the cone in two and perhaps make a picture?....
A fairy picture?...wings?....got to have some lace.....definitely have to have flowers.....

......now things are getting somewhere!


 I cut the cone in half and covered it with some printed paper. This paper has an iridescent embossed flower pattern which I thought worked perfectly for a magical sparkly fairy picture.


I dabbed some die cut lace with Frayed Burlap DI and stuck it onto the skirt


The face was a wooden bead painted with Nougat Fresco Paint. The hair was dark brown hemp string. The string was made of up three twisted strands and when I untwisted these and separated them to make the string thinner they had a lovely curl...giving a wavy, ringlet effect.


I covered the bead with strands of hemp string as a base for the hair and then added some of the finer, curly strands.

The fairy's arms are pipe cleaners covered with the card that I used for the skirt.

I added a strip of lace and a tiny pearl bead for the collar of her dress

The flowers in her hair are memory box die flowers - painted with Ice Blue Fresco Paint and dabbed with Frosted Lace Stickles Glue in the centers


The wings were embossed and then painted with Decoart Americana Decoart paint in Lace. I then dabbed some Frayed Burlap DI over the top.


The heart behind the fairy is burlap covered in lace that I stuck to a piece of card and then cut out


I used the word 'wish' from chit chat stickers


I used some ivory hemp string tied into bows along with ivory roses dabbed with Frayed Burlap DI


Memory Box flower die cuts were dabbed with Frayed Burlap DI and had a pearl bead attached


The background of the fairy was made with wrinkle free distress technique using Brushed Corduroy DI. I then added further effects by doing some 'spritz and flick' with water.

 I then stamped some script stamp with Antique Linen DI

For the main background I did wrinkle free technique using Tumbled Glass DI


The frame was constructed from balsa wood. It was painted with gesso and then a coat of Raw Umber Acrylic paint was used. This was sanded down and then I tinted some Ultra Matt varnish with a blob of Raw Umber paint. This tinted varnish knocked back the harsh whiteness from the sanded down areas of the wood and it made gave a wood more of a vintage aged woodgrain look...


And there is my completed Fairy Picture...


I do hope you like it and I hope I have inspired you to come along and join in the challenge - what can you make with a Paper Mache cone?


Thanks so much for being here!
Happy Crafting
Laura xxx


Follow on Bloglovin

Sunday, 9 February 2014

Love at first sight

Hi everyone,

    Welcome to my first Valentine creation this year! and some news!!! - I have joined the 'Anything But A Card' team!

     The challenge this month over at 'Anything But A Card' is -

Valentine Tic Tac Toe. 

Please choose your Tic-Tac-Toe row
 to use as your creative mojo!
{either straight across, down or diagonal}


Choose your direction and follow
the key below for square descriptions:


1.) Red 
2.) Recycling
3.) Glitter {can be loose or like Stickles}
4.) Bling it ON! {beads, gems, buttons, sequins and baubles - the sparkly bits}
5.) Heart
6.) Sprays and Mists
7.) Ribbons, Fibers and Trims... oh MY!
8.) Black
9.) Lace


Here is what I made - using the diagonal line including red, heart and lace....


     I had an idea for white washed effect wood....so I got some card and began to sweep some Frayed Burlap DP down the card in stripes. As you wipe the applicator across the card it often leaves streaks unless the applicator is very saturated with paint....so I often use this as a wood effect. To exaggerate the wood grain effect I stamped a wood grain stamp with Potting Soil Archival ink.


   Then I got some Picket Fence DP and wiped the applicator of excess paint on the craft mat and began to add faint streaks of white over the wood effect card.

     The base of the house was prepared with Chocolate Pudding Fresco Paint then covered in crackle glaze before being painted with Stone Fresco Paint. I then glued strips of the card over the house leaving some gaps so the crackle can be seen.

     I cut a strip of corrugated card and tore off sections to reveal the texture. Gesso was very roughly painted over it. I then used a Tim Holtz stamp in Black Archival ink and dabbed some Walnut Stain DI around the edges to soften the colour.


 Metal screw brads were used at the corners of the corrugated card.


  The heart die cut was inked with Fired Brick DI and stamped with a bubble wrap effect stamp in Aged Mahogany. A distress marker spritzer was used with Fired Brick and Walnut Stain Distress markers and the heart had Aged Mahogany DI blended around the edge.

     
I used Aged Silver Frantage on the heart........


......and applied a piece of lace with the word 'LOVE' stamped in black Archival ink and edged with Walnut Stain DI. An ivory bow made out of hemp string was attached.


Script Tissue tape was used to decorate the house


Cupid was painted with French Roast Fresco Paint and the covered in crackle glaze. The Stone Fresco Paint was painted over the top and the lovely crackle formed.


 I covered the wings with lace and then painted over the lace with Stone Fresco Paint.


French Roast Fresco Paint was dry brushed over Cupid to add some shading and a mix of Rock Candy and Diamond Stickles Glue was applied to the head, wings and leg of Cupid to add sparkly highlights.


   A small piece of balsa wood was glued underneath Cupid so that it looked like it was flying


    The arrow was dabbed with embossing ink and covered with Aged Silver Frantage


     A glittery heart from my craft stash was used at the top of the building...


.....with a banner that had had the same French Roast/ Stone crackle treatment and then the word 'cherish' was added using a chit-chat sticker that had been edged in Walnut Stain DI.

   A white organza ribbon was used to create a bow and loop to hang the house up


Why not join in the fun and share your Valentine Tic Tac Toe creations at Anything But a Card? We would love to see you there!


 photo temp3_zpsf37f8b2d.png
I would like to enter the following challenge

Country View Challenges - Painty Pleasures

 Follow on Bloglovin

Wednesday, 1 January 2014

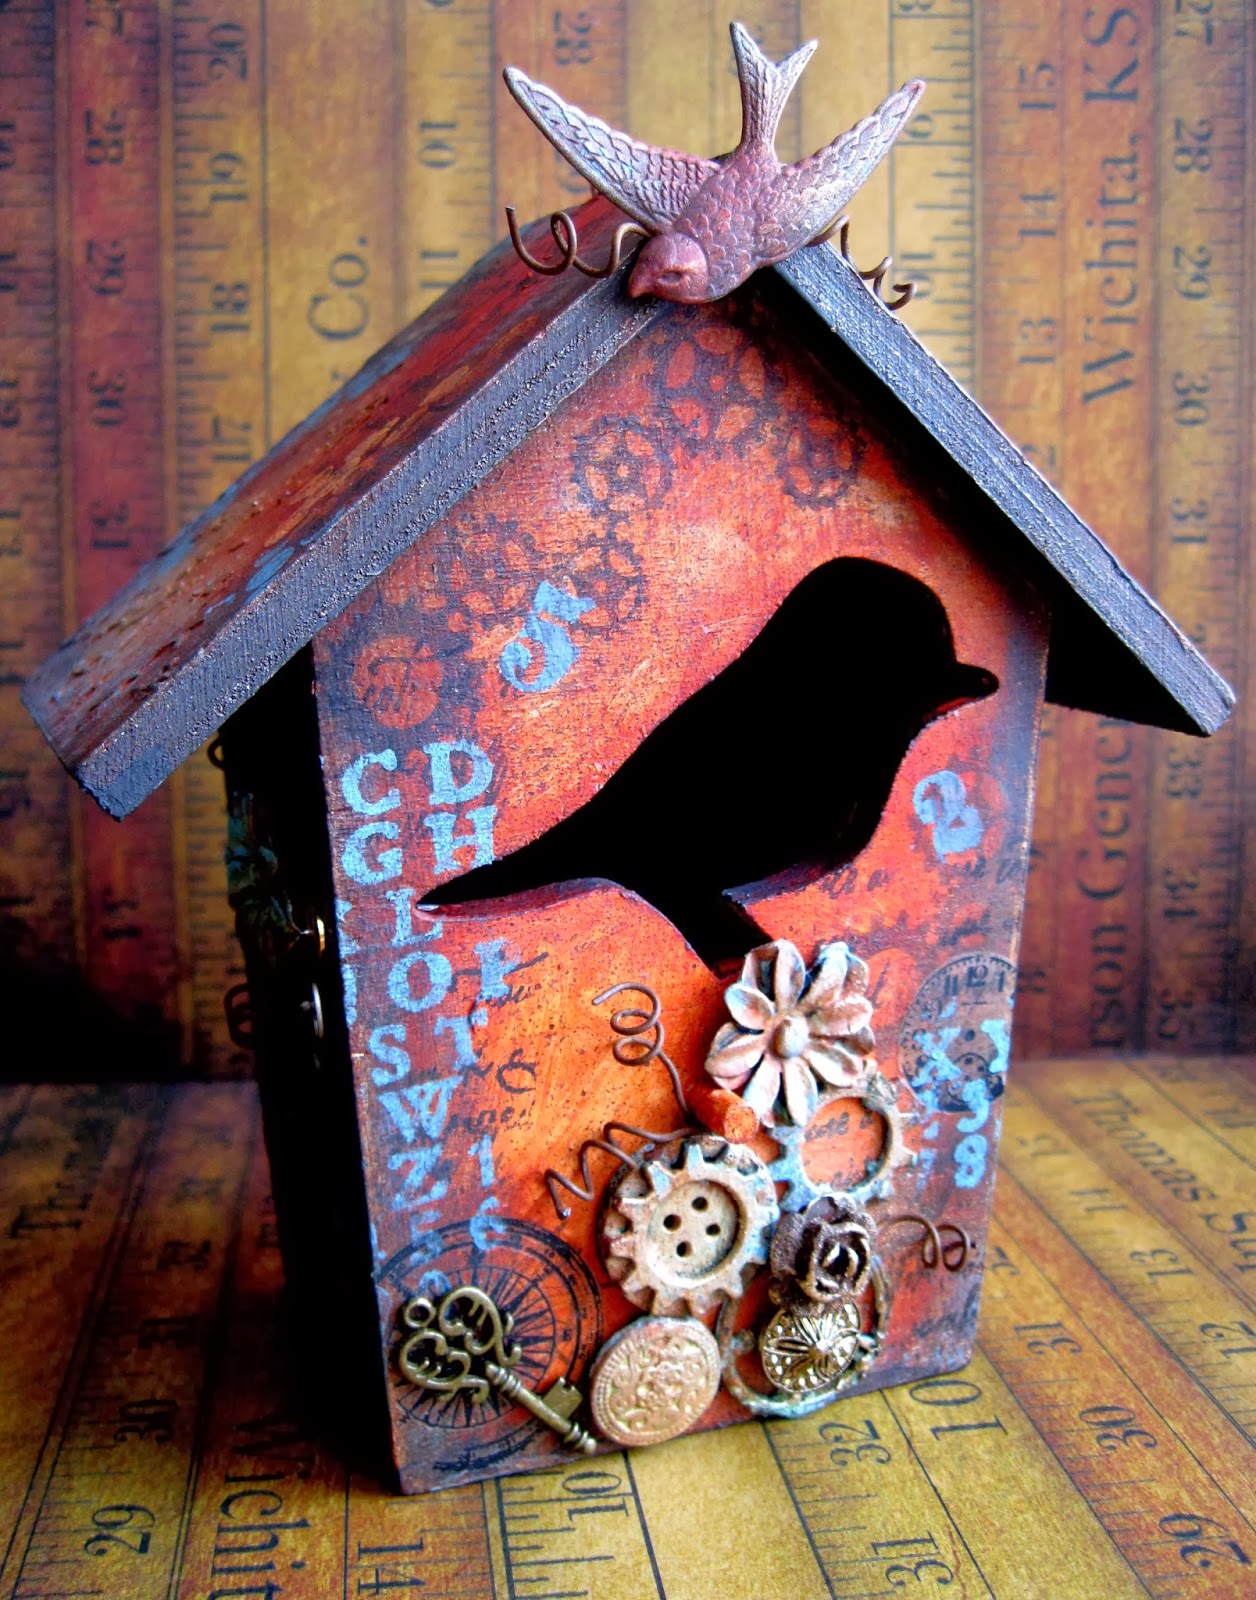
Steampunk Birdhouse

Happy New Year!

Hope you have all had a wonderful Christmas and are all ready for a New Crafty Year!

    At Our Creative Corner we want you to use your 'Shopping Sins' -  Hop over to Our Creative Corner where Claudia will explain all the details about her wonderful challenge!

      I spent last year collecting Tim Holtz Idea-ology. Some of them I did manage to use, but some just looked so gorgeous in the packets that I couldn't bear to open them.....I seemed to be just waiting for the right project to come along to use these precious embellishments, but each time I would put them back unopened thinking - "Maybe next time".......


     Even as I took this photo I was trying to decide what to use and what to continue hoarding....I decided (reluctantly) to open the foliage and the charms.....eventually the transfers found their way onto the project too!


 I decided I had to make a Steampunk creation because this is Claudia's challenge. I chose a bird house that was gathering dust on the shelf. I had just treated myself to some Decoart Paints - Transparent Red Oxide, Quinacridone Gold and Turquoise. This was my colour scheme - rusty orange and brown with hints of blue.

     I started by covering the birdhouse with gesso and when that was dry I covered the roof with Chocolate Pudding Fresco paint which was then covered in crackle glaze.

    Snow flake paint was applied over the crackle glaze and the cracks started to form. When dry I began to stencil clocks and gears around the walls with texture paste.........


 ........and some of the Mini Antiquities text over the roof.


With all the base done I then began to build up layers of the gorgeous transparent paints....starting with Quinacridone Gold I applied a layer very messily - allowing brushstrokes to show.


     Then I began building up depth of colour adding the Transparent Red Oxide and also Chocolate Pudding Fresco paint.

    When this was dry I began to dry brush some Turquoise paint and also dabbing some paint through various stencils and dabbing stamps with turquoise as well. I also stamped with gesso, applying The Quinacridone Gold over the top. I also added a script stamp with Potting Soil Archival ink.


I spritzed the bird house with Melted Chocolate Dylusions spray to add a rustic speckled look


The Idea-ology gears, foliage and charms were added after being given a totally grunge makeover with paints and inks. Each was finished off with a dry brushing of Turquoise. Some rusty embellishments left over from my Steampunk Christmas tree were added along with mini watch parts and of course, my favourite rusty wire.


         I added some of the transfers as well......


     The final touch - the bird from the charm set was attached to the top of the bird house after being given a painty makeover....The photo doesn't do it justice here...after being painted I brushed the bird very lightly with Treasure Gold in White Fire with a very soft brush...it gave it a lovely iridescent style sheen....some curled rusty wire was added here too...


   I Hope you have enjoyed this Steampunk Birdhouse! Come on over to Our Creative Corner to see what else my talented team have made for you! Why not have a hunt around and see what treasures you have stored away and use them! Join in the challenge this month and you could be our Top Talent winner, or one of our Top 3. You could even receive a wonderful 'Crafty Individuals' prize!


 photo temp3_zpsf37f8b2d.png
Follow on Bloglovin