Wednesday 30 January 2013

Wood and a button


    Hello everyone!

        Sorry for doing another post so quickly - I have finally got everything done and it was all photographed, so I decided to go ahead and write it while the kids are still at school and there is peace and quiet!

    Today is Wood with a button....from the Our Creative Corner challenge. I ran through so many ideas for this one and really struggled before deciding I wasting too much time thinking - why not just make some wood effect card and go from there?

    So I got some DI's (Gathered Twigs and Pumice Stone) dabbed them on the craft mat, spritzed with water and then ran a brayer through the ink puddle. Then I rolled it over the cream coloured card. It gave a lovely streaked appearance. I let it dry and then stamped over the top with a wood grain stamp using Walnut Stain DI. I began to colour over the wood patterned card with the blending tools and more ink. This time adding Stormy Sky into the mix as I love browns and blues together.

    By the time the wood effect was done I had decided to do a tag (what a shock!) and so I hunted through my pictures. I found a Victorian image of a young girl and I loved the sepia effect but it also had a hint of blue to it....perfect for the blue tinged wood. So now I definitely had the colour scheme...I would go for brown with hints of blue.... Now to make the tag.


     This is the photo I chose. It is a shame that the colours don't reproduce as well on computer monitors. It really is a lovely photo with very slight hints of blue and beige.....


The photo was stuck onto cream card and I cut the card very close to the edge of the photo. This was then stuck onto some cream card that had been stamped with a lace pattern in Antique Linen DI.


The lace stamped card was then torn around the edge of the photo and stained with more Antique Linen and Walnut Stain DI.


    The flowers were die-cuts that were inked with Antique Linen and Stormy Sky DI and edged with Walnut Stain DI. I decided to ink the leaves blue as well with edges of brown. I didn't want any other colours in this tag other than brown and blue. Some paper covered wire was stained with Walnut Stain DI and curled before being stuck in place with the flowers and leaves.


More flowers were at the top of the card attached around a curled vine effect wire. The paper covered wire was stained with Walnut Stain DI that had been dabbed onto the craft mat and had a very small amount of water added. The wire was then rolled into the ink and dried.


 The blue strip of cardboard at the back of the tag was a lucky find. I planned to cover a strip of cardboard with some glimmer sprays. When I opened my 'Spray box' that I use to protect surroundings from the sprays, I found the lid was a lovely bluish colour from all the excess spray. I tore it into the size strip I needed. The photo doesn't really do it justice...it is such a lovely mix of blue, silver, gold and copper......


   And of course the button...the challenge requested at least one button. I only had one that suited this tag...a lovely muted brown with a gorgeous iridescent sheen....


I originally wanted to have lace at the base of this tag but it didn't look right. Then I got the idea to hang a panel from the tag - something I had seen other crafters do before and had really liked the effect. So I cut another section, this time turning the wood grain around so it went in the other  direction.
   I coloured a frame with Burnt Sienna acrylic paint and then covered it with copper metallic rub-on. The same lace stamped card used to frame the portrait was the backing for this frame and the words 'LOVE' was added with copper metal letters. This panel was added to the main tag with paper covered wire, stained with Walnut stain DI and curled into rings. More flowers were added to match the main tag.


        So there is my finished tag.....Hope you like it!

                                                  Take care!


      I am entering this in the following challenge -

Our Creative Corner  - Woody with a button
Fashionable stamping challenges  - Show some love

Sleeping Stars


   Hello everyone!

    My blog post today is 'Seeing Stars'....the new Simon says challenge. I struggled with this one I must admit. My first idea was film stars but with the computer down and out I was stuck for images. Then the nursery rhyme 'Twinkle twinkle little star' kept coming back into my head...I adored singing to my children when they were babies (I still do sing with them now!) and the idea for a baby themed tag came into my head - quite appropriate really as it is major baby boom time amongst my friends and relatives lately....

      So here is my tag -


I apologise for the photo quality - I use natural sunlight for photos but the amount of white in the picture has left everything with a bluish glow and getting the exposure right with the dark brown teddy has been quite a nightmare - Anyway, moving on........


I used a pale yellow paper background that was printed with various words. Then I tore a strip of night sky paper with pale yellow stars and stuck that down the side of the tag. The white edges of torn paper were inked with Shaded Lilac DI. The nursery rhyme words are pale blue letter stickers.


The little teddy bear (whose name is Tim by the way) was made from a brown pipe cleaner. The bed cover, pillow case and sheet were all made from my dolls house material supplies. No sewing, the material was cut and then folded over wadding and glued - held in place with pegs until dry. The white daisy ribbon was glued to the pillow and for the sheet I pulled out some threads to give it a slightly frayed edging.

     The bed was constructed out of the Tim Holtz hinge and key die-cuts and attached to the tag with glue and a white painted brad. The base of the bed was white card folded around the bottom of the tag and covered with lace die-cut to look like a lacy valance sheet.


   A yellow dotty ribbon was added to the top of the tag. I had thoughts about dangling a safety pin or dummy from the ribbon but I wanted to keep the tag as plain and simple as possible.


So there is my 'Stars' themed baby tag - I hope you like it

Thanks for being here


I am entering this in the following challenge -


Tuesday 29 January 2013

Spruced up


     Hello everyone - Hopefully a quick blog post today (I'll try to keep the waffling to a minimum!)

       I just wanted to show you what I made for the Frilly and Funkie 'Spruce it up' challenge'

    I was instantly tempted by this challenge as I have been meaning to decorate one of my sets of drawers in my craft cupboard for ages - and this challenge pushed me forward to do it!....It was a long process, well, longer than I normally take, but I think it was worth it. Only problem is, now I want the drawers to store trinkets and treasures instead of ribbons and paint!


 This is the set of drawers - It started out as plain light wood once upon a time and I stained the box and painted the drawer fronts pale yellow and decorated it with daisies.


Then my daughter decided (when she was about 3 or 4) that the decoration could be improved and set about doing her own design.......


My son has added his own decorations (not wanting to be left out....)


So it was time to turn it into something nice (hopefully) -

First I re-stained the outside of the drawers....it was marked and faded so it needed a new cover of deep mahogany stain.


   I wanted frames for the labels on the drawers so Alison very kindly cut some for me. I took ages trying to choose between a tarnished silver or bronze....I tried out both but silver won in the end....though I wonder now whether it was just my new crackle paint that scored the extra points for being more fascinating to use than Burnt Sienna acrylic paint!


Once the frames were all crackled and ready to go for the tarnishing, I got some brown and black acrylic paint and dabbed and wiped with a tissue. After this I applied some copper metallic rub-on.


   Cream coloured card was inked with Antique Linen and Pumice Stone DI's and stuck to the back of the frames. Antique style metal brads were added


   I still don't like my handwriting but the alphabet stamps I have weren't right for this and I had no other way of doing the words (printer not working again!) So the handwriting had to do!


   I wanted Roses and Lace to decorate the now paper covered drawer fronts. I didn't have enough of the right size flower shapes so I drew around the one that I had and then cut them all out by hand. I inked them with Antique Linen DI and then dabbed around the edges with Victorian Velvet DI.


   Each flower was then constructed (for a step by step explanation on how to make these - click here)


   I covered three drawers with brown shades of paper and three with pink shades. All were very antique, vintage style papers but I added some extra distressing with Gathered Twigs DI and sanding after each layer of Mod Podge


 The brown drawer fronts all had lace die-cuts at the tops and the pink drawers had roses and leaves.


This paper was very plain so I stamped flourishes around it in Gathered Twigs DI


      So here is the finished set of drawers


         I hope you like it! Bit of a change from my usual tags!!! I'd love to know what you think, so if you have the time to spare please leave me a comment....


   I am entering this into the following challenge -

Frilly and Funkie  - Spruce it up

Monday 28 January 2013

Flower Power


    Hello again! - Thank you for being here and a big WELCOME to my new followers!

    I am here to bring you a tiny taste of the spring to come...when we can relax in warmer weather....Today I bring you flowers....and bunting........and mixed media!

   
     Mixed media is a craft that I had never done and to be honest it frightened me a little. Wondering about what if I get it wrong....but forget all that - There are no rules in craft land...if it works for you and you are having fun then go for it. And of course fun is the key word.

     I was hunting about online for crafts, searching blogs and decided to look for mixed media. Suddenly I found a wonderful tutorial. I really loved the picture the artist made - and I knew my little girl would love it too, so I decided to make it for her.

    I didn't have the majority of materials that the artist was using (what a surprise!!!) so I knew that this was another project where I would have to do a certain amount of searching for alternatives. Luckily, as I watched the tutorial, my mind began ticking with ideas...."I don't have transfers, but I could use my stamps. I don't have that paper set but I do have a scrap box to hunt through....."

     Luck had been on my side earlier when my wonderful husband called me while he was shopping and said "This shop has art canvases for sale really cheap - 99p each - do you want some?" I gave him instructions to buy some of several sizes and then, bless him, he picked up some very cheap (and surprisingly really good quality) paintbrushes too.

     So here we go....I apologise for the very photo heavy post - I thought I would try to do a step by step view of this project....I managed ok- (ish......forgot to pick up the camera a couple of times) ;o)


    The canvas I chose was 8 x 8...a nice smallish size....I covered it with Mod Podge.


      I then stuck some music paper on the board and tried to flatten it as much as possible. There were a lot of wrinkles that would not smooth out but that adds a nice texture. This music paper was part of the Christmas crackers wrapping that our family had on Boxing day this year. Alison and I had half a set each - Please take a look at her blog and you will be able to see how she used part of the paper.


    Once the glue had dried I added a layer of Mod Podge over the top of paper...again trying to smooth out bumps and wrinkles - with not much luck I am afraid...so like the lines that are around my eyes, I chose to accept them!


     Pale blue acrylic paint for the sky. The paint was covering up the music notes too much when applied with the brush, so I grabbed a baby wipe and the 'smooshing' began.....


      That is much better...the paint is now covering the board and the notes are peeking through...


All done for now....no need to paint right down to the bottom of the board as I am painting grass there when the blue paint has dried....be back in a moment after I have washed up the paintbrush and tidied up a little........


     Ooops! Oh no!!! I got so carried away having fun with the next two stages I forgot to pick up the camera!!! So sorry - I got caught up in the creative moment. Anyway, we are back again and the grass was done with acrylic paint. Green and yellow blobs of paint applied straight to the board and 'smooshed' around with the baby wipe. A paintbrush was needed just to add the neat edges and as I applied the paint quite thickly here I swirled the brush through the paint to add some texture.

     Triangles were cut out from scrap paper pieces and the circles cut with a circle punch again from scraps. I bit of twine was glued along the top of the board and all the paper was stuck with Mod Podge. I found a very cute button sewn onto flower shaped material so stuck that to the corner of the board.

    
     I got some white acrylic paint and began to brush some onto the edges of the bunting......


Just to give it a bit of a distressed vintage look


Some stamping now....I chose some flourish stamps and some DI's - Forest Moss, Stormy Sky and Tumbled Glass


I used the darker blue first and began to gently pat the stamps across the frame. I knew I wasn't going to get a very defined image as it is a stretched canvas frame so it dips in the middle if pressure is applied. Not very helpful when you want a clear stamped image. Luckily here what I wanted was just a bit of detail, not an exact image. I then repeated the image with the Tumbled Glass DI.


Both sides of the picture are done....


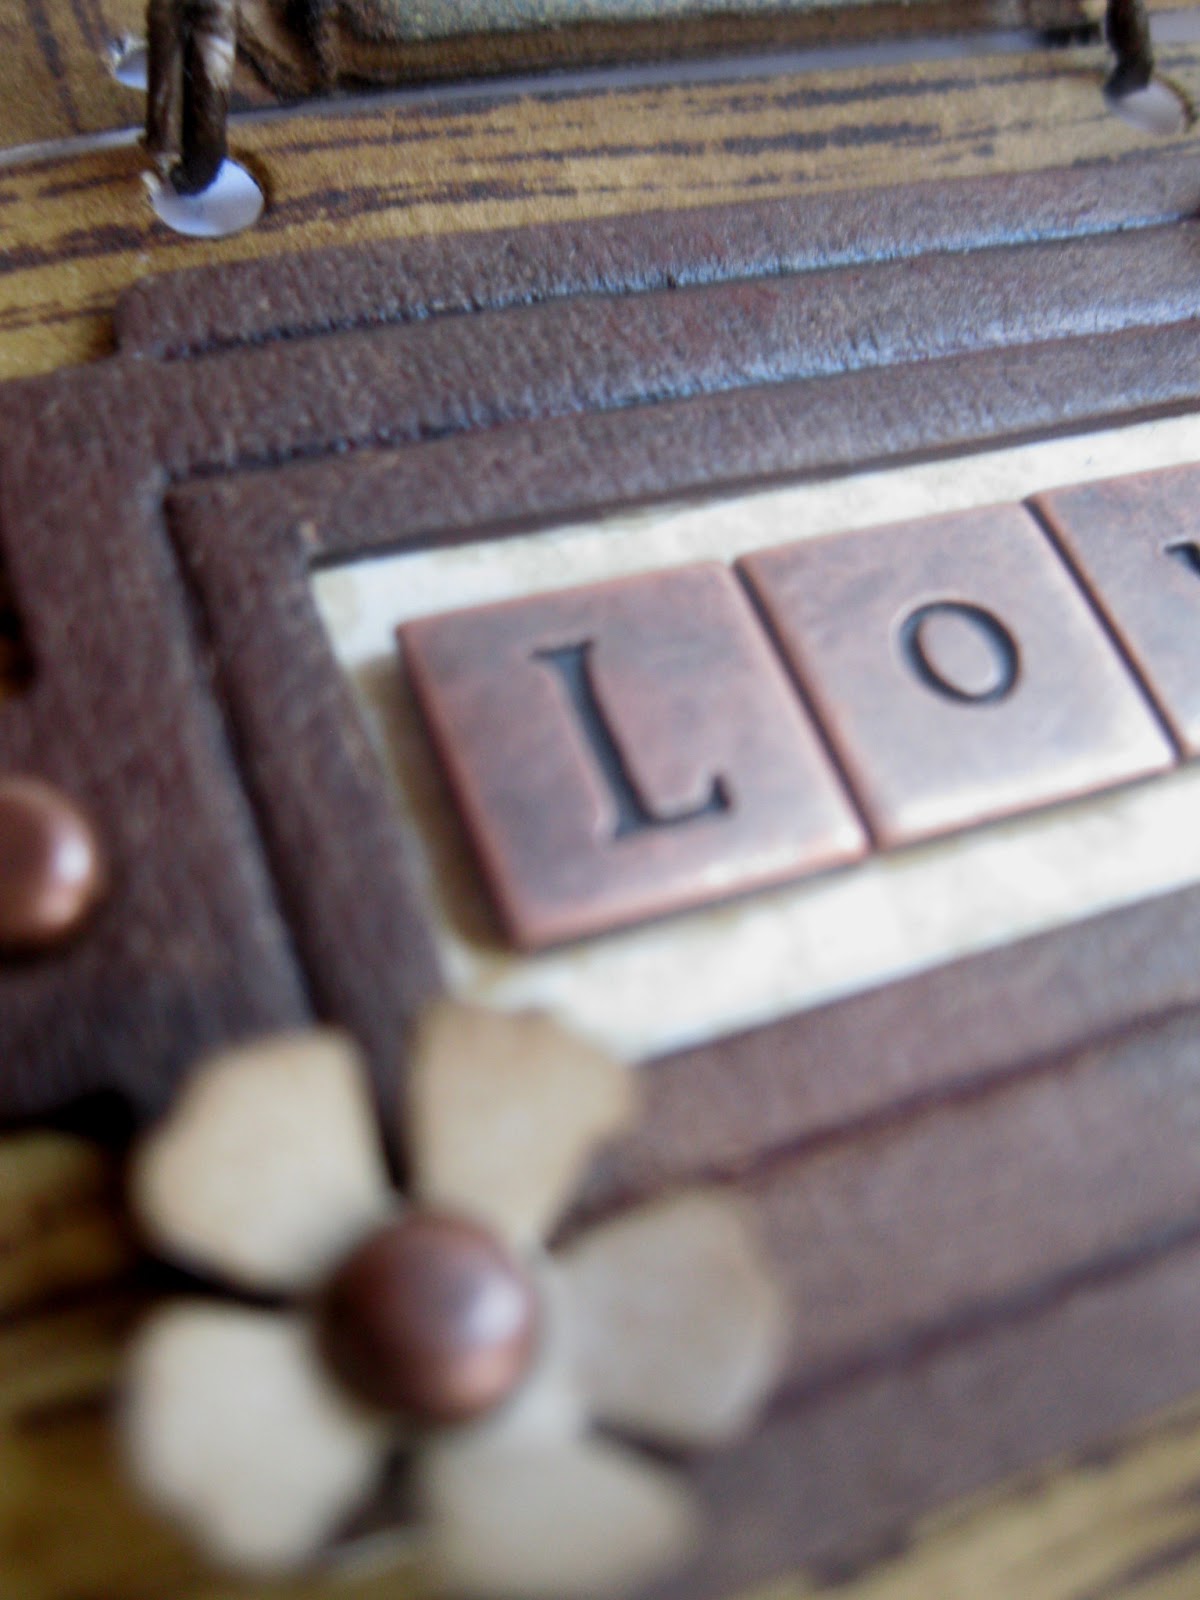
The word LOVE is in the original picture and I wanted to have that on my picture - Christy used a transfer, which I don't have but I do have a stamp so that was used instead. However, I was worried about stamping directly on the canvas, especially as it was difficult to be able to press hard enough. It is also something you only get one shot at, and I really didn't want to have to be painting over the stamp mistake. I decided to stamp the word on tissue and then stick it to canvas with Mod Podge....


    Wording done!


The grass is nice and bright - but the colour is too flat. So I get a flourish stamp inked with Forest Moss DI and stamp randomly along the grass...staying closer to the bottom of the canvas to indicate shadows and represent detail in the foreground...


 The Circles are masked and a script stamp is dabbed onto the canvas - again I wasn't going for a perfectly stamped text, just hints of script floating along....


  I then began to add detail with a fine permanent pen. I drew around the bunting, adding in stitching detail, lacy effects or just drawing the lined edge and leaving them plain.


The top of the bunting looked a bit plain to me - so I added some....um....errr.....loopy strings?...I have no idea what they are but my hand drew them - I accept no responsibility ;o)


   I then turned the flower circles into the centres of flowers...I drew around the flower and added a stem and leaves with the pen, adding in some other leaf effects here and there. I glued a button in the centre each circle and painted the leaves green.


     And here is the finished picture


      I really loved doing this picture. I wish I could claim that the concept of the picture was mine but it wasn't. Like I said earlier, I was inspired by a tutorial that I found online - You should all take a look at the original done by Christy Tomlinson. which is just beautiful....

        ...Of course mine is nowhere near as good. I am not saying just saying that to be modest...I really adore Christy's style of art and it is a style I wish I could do but as we know.... you can try to 'copy' a style but at the end of that day your own style stands firm and refuses to be pushed aside. So I could spend hours trying to replicate that style that I admire, but I have my own.

     Seeing as this is my first ever attempt at mixed media, I am very happy with it and it makes me think that perhaps I could do more and that is such a happy thought!

     Hope you like it - please leave a comment for me if you are here to take a peek. I would love to know you visited!

            Take care!


I am entering this into the following challenges -

Fussy and fancy - Circles
Fashionable stamping challenges - Show some love
The shabby tearoom -  Cute as a button