Thursday 24 March 2016

Cup of Tea?

Hi everyone!

Still on Spring themed creations here and still wanting to use Tea bags....

I found a stash of Earl Grey tea bags I bought over a year ago at the back of the cupboard and as they no longer have any of that wonderful citrus aroma, I decided they would be best used doing some creativity....

So I brewed a pile of them, cut them up, left them to dry and got to work....


 I got a piece of card and stamped a dragonfly, a script stamp and some words on it in Jet Black Archival ink


Then I began to cover it with torn strips of tea bags


I love how the crimped edges of the bags add some wonderful texture
 

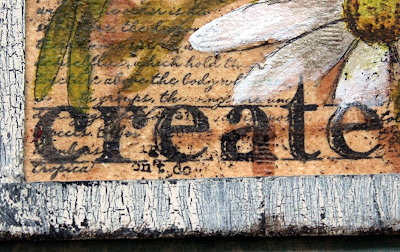
 I drew a daisy outline and some random leaf shapes. I painted the daisy with Decoart Media Translucent White and added a dab of Decoart Media Raw Umber paint near the center of the flower to add shadow. I painted the center of the flower with Decoart Media Primary Yellow and shaded some Decoart Media Pyrrole Orange at the base of the center adding some Decoart Media Burnt Umber dry bushed to add shadow and depth...I love how the texture of the tea bags add to the texture effect of the flower center,


I painted the leaves with Green Gold.


Then I drew around the outlines roughly with marker pen..leaving some leaves undefined as background

I then stamped a text stamp with Jet Black Archival ink and randomly dabbed over the painted images


I painted the dragonfly wings with a mix of Decoart Media Yellow Green Light, Cobalt Turquoise Hue and a dab of Quinacridone red. When dry I coated it with Decoart Media Interference paint in Turquoise which gives a stunning iridescent sheen.


I made the frame out of mountboard. I covered the mountboard with Raw Umber paint then covered it with Decoart Weathered wood. Once dry it was covered with Nougat Fresco paint which crackled perfectly.


I rubbed over the crackled paint with a piece of sandpaper and then dry brushed some Decoart Media Raw Umber paint around the edges of the frame


I glued the picture inside the frame using another piece of Mountboard at the back to secure it


I used two silver Ideology Hitch Fasteners and some twine


and there it is....a new hanger made from Tea Bags


 Thanks so much for being here!

Happy Crafting

Laura xxxx


Follow on Bloglovin

Saturday 19 March 2016

Nature in Neutral

Hi everyone!

      I was hunting for some inspiration and came across the idea of using old teabags for crafting.
I really liked the rustic look of it so decided to give it a go...

Not sure I can say I mastered it yet!...but it was a lot of fun!


 I got a piece of card and stamped it in several place with a variety of stamps using jet black archival ink. I also glued on some torn bits of french dictionary paper


When this was done I glued on some torn strips of used teabags...I tore random sized pieces and kept the edges of the tea bag on to add more texture.


I then made the mistake of lightly dabbing Decoart Translucent White acrylic paint over it. It had a nice effect, giving a slight chalky finish to it, but it knocked the colour back too much. So I covered the entire thing with some Gathered Twigs Distress ink.


To make the background I brushed mount board with a thick layer of Decoart Gesso - making sure all brushstrokes went in the same direction. Then when dry I covered this with a mix of Raw Umber and Carbon Black Antiquing Cream. When this was dry I wiped it away with a damp cloth and it gives a great wood effect...


I stamped the word 'Nature' onto card with Jet Black Archival ink and then covered it with a piece of tea bag


I made the central panel out of a part of a French botanical book....


I cut out the word 'botanique' to use on the hanging


I used some dried flowers for the decoration...stuck them to the center and added twisted black wire and ivory hemp string tied into a double bow


I dabbed around part of the hanging with Decoart Media Raw Umber paint....


Black metal wire finished off the hanger


So here is my 'Nature in Neutral' hanger! Hope you like it!


Thanks so much for being here today!
Happy Crafting!
Laura
xxxxxxx


 Follow on Bloglovin

Thursday 17 March 2016

Is it Spring yet?

Hi everyone!

 I can't wait for Springtime to get here!

So I thought I would make a spring themed creation - but with nothing in the garden here yet to inspire me - I went a bit grungy instead!


I started with a piece of mount board and painted some Decoart Media Gesso over it as a base. I applied it quite thickly, making sure brushstrokes could be seen and that they all were going in the same direction...The intention was to make the base look like a wood effect....


 Then I applied some Decoart Media Crackle paste through a TH Lattice Stencil. At the edges of the stencil I scraped some more paste, randomly dabbing or wiping it down the edges of the board


When this was dry I mixed some Carbon Black and Raw Umber Decoart Antiquing cream together and applied this all over. I love both colours but I find the Raw Umber a bit too pale at times and the Carbon Black too grungey...so here I was going for a soft black instead and gained the best of both colours.

When dry I wiped it away with a damp cloth. I prefer to use a cloth spritzed with water as then you are able to remove the excess gradually - I find a baby wipe can wipe a bit too efficiently and before you realise it there is barely any effect left!

The cream stayed in all the crevices of the stencil and highlighted the gesso brush streaks perfectly....


The crackle paste gives such a wonderful effect...and is perfect to apply through a stencil...


I wanted to capture the effect of some garden furniture left to the elements...so a peeling paint/rust/weathered look..... 

So around the edges I began to dab some Decoart Media Texture Paste. When dry I painted over it with Paynes Grey Decoart Media Fluid Arcylic Paint mixed with white acrylic paint. Then I gave this a wash of Paynes Grey and then a coat of Qinacridone Gold. I wanted an even more aged effect, so I covered it with Patina Green Antiquing Cream before wiping away - leaving a tinge of Patina on the rust.


After this was done the whole hanging got a coat of Ultra Matte Decoart Varnish - which lives up to it's name - it gives a totally matte coating and removes any sheen from the paint...this makes the rust even more effective

I decided to put the word 'Spring' on the hanging and used some letters from a TH paper pad.


The flowers were from the Tattered Floral die cut set and I cut several sizes, then I got to work making them up...


This one was made by bathing the flowers in a wash of Squeezed Lemonade DI mixed with water. Then the larger flower was dabbed with some Scattered Straw DI before both flowers were 'grunged up' with a smudge of Pumice Stone DI.

The center of the flower was a metal brad coated in gesso, followed by a coat of yellow acrylic paint before having a bit of Rock Candy Distress Glitter sprinkled over.


This flower was dabbed with Tattered Rose and Pumice Stone DI. A blob of Decoart Liquid glass was squeezed into the center of the flower before having some Tea Dye Distress embossing powder sprinkled over the top.


 This flower was covered with Shaded Lilac and Pumice Stone DI. A blob of Decoart Liquid Glass was squeezed into the center and when dry it was dabbed with a bit of Decoart Media Titian Buff Acrylic paint


This daisy effect flower was left uncoloured except for dabbing around the edge with Worn Lipstick DI. The center was made by the same way as the first flower...


The leaves were bathed in Shabby Shutters DS and when dry the large leaves were coated with Decoart One Step crackle glaze. When this was dry I dabbed the leaves with Gathered Twigs DI

Just to finish it off I added some chit chat stickers 


 And added rusty wire to make the hanger


And there is my (Grungy) Spring Hanger


Thanks so much for being here today!

Happy Crafting!

Laura
xxxxxxx


Follow on Bloglovin

Tuesday 1 March 2016

Return of the Challenge

                          
Hi everyone!

 It is my turn to run the challenge over at Our Creative Corner this month!

We are taking a trip down memory lane for this challenge! 

I would like you to re-visit a challenge that has been featured at OCC since June 2013

I have decided to shorten the list of challenges a little by leaving out seasonal challenges and some very recent ones - so please select a challenge from the list featured here.

Any entry that is not a challenge from this list will not be included in the Random.org prize draw and will not be selected as Winner or Top 3.

So please make sure you select a challenge from this list!

Please state what challenge you chose 

So click the link - reacquaint yourself with the rules of the challenge you want to do and have fun!

~~~~~~~~~~~~~~~~~~~~~~~~~~~~~~~~~~~~~~~~~~~~~~~~~~~~~~~~~~~~~~


I decided to re-visit the challenge run by our wonderful Claudia who set a Steampunk Tic Tac Toe Challenge in November 2013!

I loved this challenge the first time round when I made this....using the line Wings, Gears and Wire


Looking at the grid again I was spoilt for choice....


I decided to go for the center line and work with - Flourish, texture and a heart...

and here is what I made....


I have always been a 'hint of Steampunk' person...rather than diving into the whole industrial grunge look (which I adore by the way, I just find it hard to do) I tend to make it slightly more feminine...so that is why the heart and flourish appealed.

I began with embossing some card - the first elements of texture. I used the Sissix Texture Fades Diamond plate and Riveted Metal Embossing folders. The texture on the heart vanished in the rust treatment, but the background for the tag still shows through


I began to do some rust treatment on the embossed card to add extra texture. First applying Decoart Media Sand Texture Paste, leaving this to dry then painting it with Decoart Media Paynes Grey Fluid Acrylic Paint mixed with white acrylic paint. 

Then when this was dry I covered it with a wash of Decoart Media Paynes Grey Fluid Acrylic Paint 

This was followed by dabbing it with Decoart Media Quinacridone Gold Fluid Acrylic Paint.
 I apply it in varying levels if thickness and in some places I dry brush it. This gives a very realistic rust finish.


I did the same process with the heart, but made the rust much thicker.


I cut a large flourish using a die cut and then cut it into pieces. I covered each flourish piece with Decoart Media Sand Texture paste. Then when this was dry I coated it with Carbon Black acrylic paint before applying a coat of Ultra matte Varnish - which really highlights the texture


I cut a piece of patterned paper from a Prima set and knocked back the lettering detail - with a diluted wash of white acrylic paint


Then I dabbed Decoart Media Burnt Umber Fluid acrylic paint around the edges with a sponge and stamped over it all with a crackle stamp using the Burnt Umber paint

Black brads were used to attach the paper to the tag


The heart was positioned on the tag with the flourish elements around it.


Chit chat stickers were arranged on the heart


Additional strips of embossed card were added to the top and bottom of the tag along with bronze brads to add layers...


And there it is...My steampunk Tic Tac Toe card made using
the center line 'Flourish, Texture and a Heart'.


I hope you will join in with us at Our Creative Corner this month with your creations from the past!
Our sponsor this month is...


Artistic Outpost will be donating a $15.00 gift certificate to our randomly drawn to spend at their online sister-store Our Daily Bread Designs, where Artistic Outpost resides.

Definitely a prize worth winning!


*************************************

Why not enter and you could be our winner chosen at random! 

You could be our Top Talent at Our Creative Corner and you could get picked as one of our Top 3! 

So many ways to win but you got to be in it to win it!

Happy Crafting!
Laura
xxxx


Follow on Bloglovin